A practical reading and viewing guide for your DealMart kit.
Know what is in the box, what to check and where to find the next step. This guide brings the current kit list, creator demonstrations and written instructions together.
01 / UNBOX
Check what is in your case.
Start with 12 foam cans and the accessory set below. Keep the order details and can labels so you can identify the exact product when asking for help.
1Applicator gun
1 pairGloves
6 pairsNozzles · 6 straight + 6 angled
1Protective coverall
1Pair of safety goggles
1 canFoam cleaner
Some photos and creator videos show an earlier accessory arrangement. Use this current contents list when checking your kit.
Each red nozzle pair gives you a straight tip and a 45° angled tip. Both are attachments for the applicator gun.
DealMart application guide · Click or tap to enlarge
→
STRAIGHT TIP
Work in front of you.
Use the straight nozzle on the applicator gun for forward-facing spray work, such as accessible wall surfaces. It directs the spray ahead of the gun barrel.
↗ 45°
45° ANGLED TIP
Aim toward overhead areas.
Use the angled nozzle on the applicator gun for upward-directed work, including ceiling areas where the product is suitable. The angled outlet changes the spray direction relative to the barrel.
6 PAIRS / 12 TIPSPer 12-can case: 6 straight tips + 6 angled tips. Larger packs include the same ratio.
Read the application steps
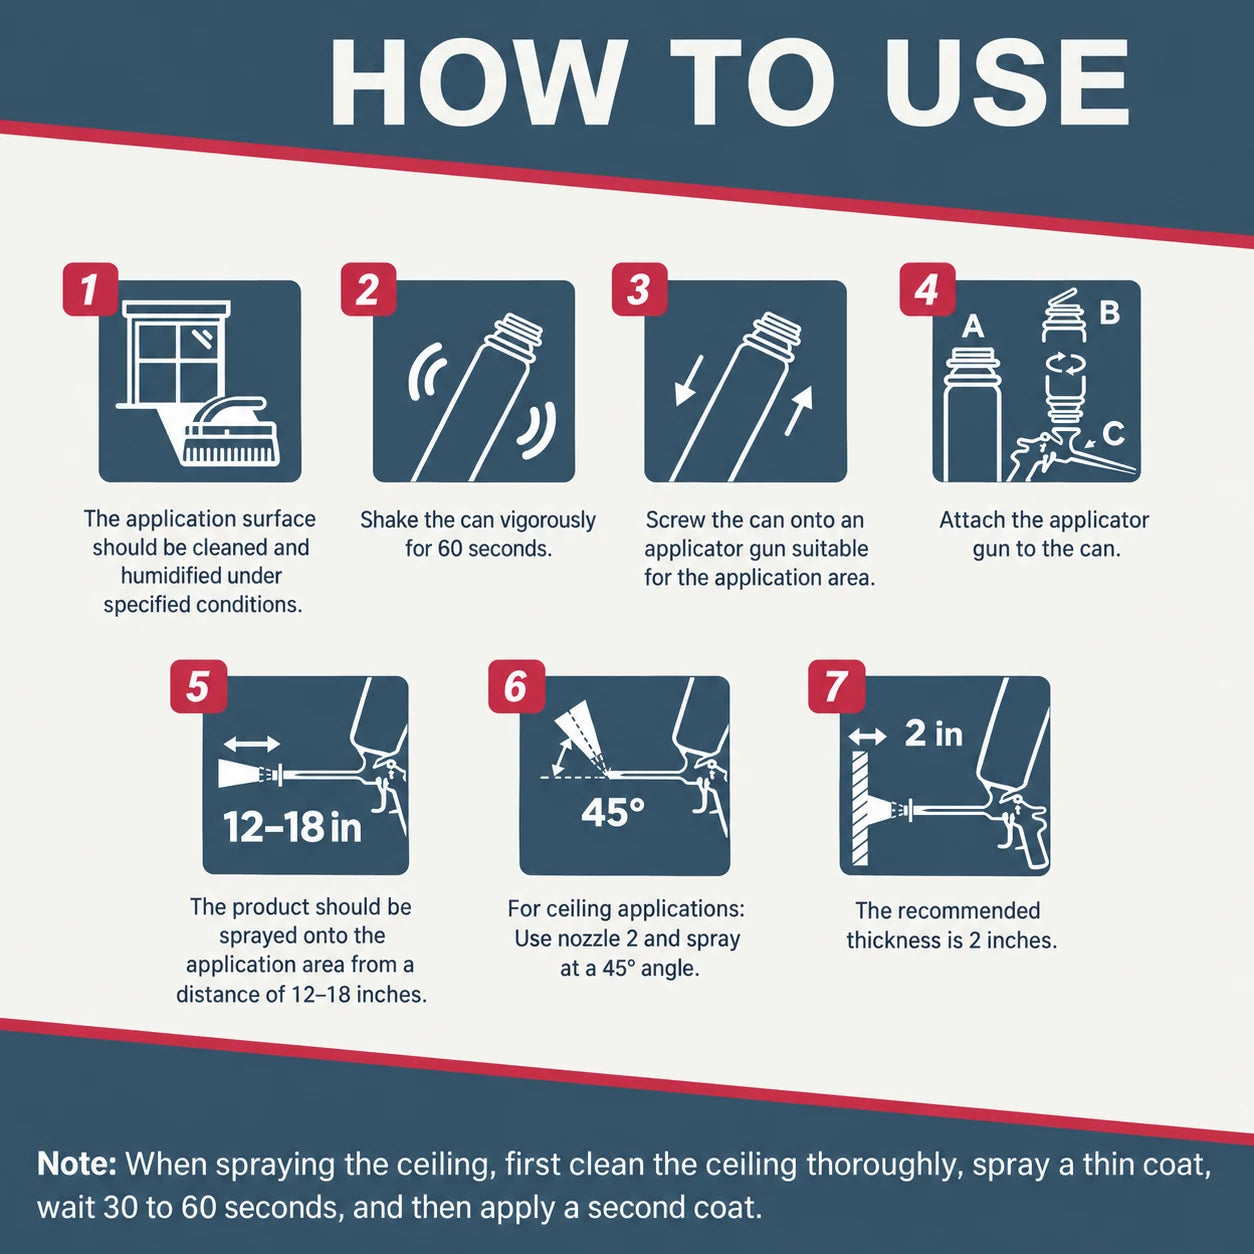
Clean the application surface and dampen it as specified in the product instructions.
Shake the can vigorously for at least 60 seconds.
Fit the can and applicator gun following the equipment’s connection instructions.
Choose the straight or angled nozzle for the intended spray direction.
Spray from a distance of 12–18 inches.
For suitable ceiling applications, use the angled nozzle and spray at 45°. Apply a thin first coat, wait 30–60 seconds, then apply a second coat.
The manufacturer-recommended foam thickness is 2 inches. This is not a stated maximum thickness per pass; follow the product instructions for layer application.
Read the safety and protective-equipment requirements before use. The interval between coats is not a full-cure or re-entry time.
Choose the direction for your work, then check product suitability, nozzle fitting, can orientation and the required protection in the exact product instructions. The angled tip does not change the foam’s coverage or establish suitability for every ceiling assembly.
Check the setup before use.
Read the exact gun and nozzle instructions before fitting or removing attachments.
Confirm the intended surface and assembly are supported by the foam instructions.
Follow the foam and cleaner requirements for ventilation, protective equipment and handling. The included accessories may not meet every requirement of your task.
If the fitting method or can orientation is unclear, contact DealMart before assembly.
Fit and prepare. Check the gun and can connection, select the straight or 45° tip, and follow the preparation steps above. Shake the can for at least 60 seconds.
Check the first spray. Confirm the spray pattern on a small, suitable test area before continuing. The creator highlights show application; they do not provide a separate, continuous test-spray demonstration.
Apply in layers. Keep a 12–18 inch spray distance. For suitable ceiling work, use the angled tip at 45°: apply a thin first coat, wait 30–60 seconds, then apply a second coat. The recommended foam thickness is 2 inches, not a stated single-pass maximum.
Clean and store. Use the exact cleaner and gun instructions for disconnection, cleaning and storage. The silver cleaner is a separate product with its own safety requirements.
Read the written steps alongside the videos. An edit between spray passes does not measure elapsed time, curing or safe re-entry.
Watch the applicator movement and freshly applied surface in the creator highlights. Lucas’s shed source footage includes a first coat and later additional spraying; the edited highlights are a visual introduction, not a timed layer-by-layer procedure.
Read Section 10 for preparation and precautions, and Section 16 for the current spray setup.
For the spray setup shown above, the manufacturer recommends 2-inch foam thickness. Review the permitted assembly and layer procedure; this is not a building-code or fire-rating approval.
Visible foam texture is not a measurement of insulation, noise reduction, air leakage or cure time.
The English PDF covers preparation, application precautions, technical data and storage. Page 4 adds the current kit contents, nozzle options, spray distance, ceiling-coat interval, thickness and planning figures. It is not a Safety Data Sheet.
Version 1.1 · October 29, 2026 · Current accessories, spray setup and planning figures added on page 4. Confirm the document matches your product label. Reported cutting time is not a full-cure or re-entry time.
Paid creator demonstrations; products provided by DealMart. These videos illustrate the product and handling. They are not a complete installation procedure or a substitute for the exact product instructions.